Beginners Guide to BATCH
So this certainly won't be as long as my C# or Python guides, but they will be pretty fun!
Batch is a very simple programming language, its also defines many hackers.
In this lesson series we'll cover making some simple applications, and demonstrating some ways that batch files could be used.
Lesson 1: Hello World
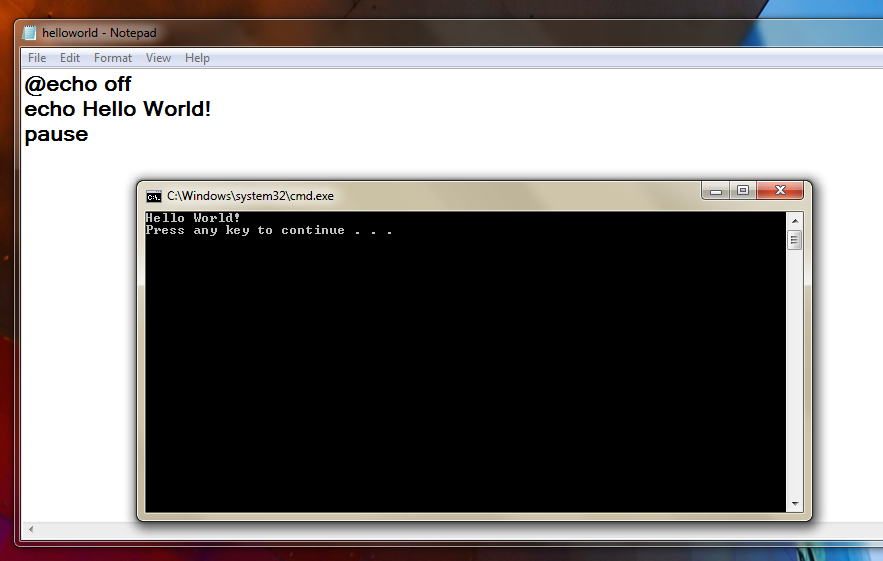
Let's create a hello world application. We're going to begin by opening Notepad. We'll then add in the following code:
Code:
@echo off
echo Hello World!
pause
We then tell it to echo out (print/write out) "Hello World!"
We then pause the application.
Now you need to save that into a batch file. To do so, click File > Save As. Type in:
Code:
helloworld.bat
Then press save, and you should have your bat/batch file.
Open up where you saved the file to, and then run your file.
You should get a result the same as the black window in the picture below:
Now we'll give the echo on part a try.
Create another notepad/batch file or just modify the one you currently have.
Change the first line from @echo off to @echo on, so you have:
Code:
@echo on
echo "Hello World"
pause
You'll notice some additional text lines. These lines begin with your file's location, and end with the command you input, then on the line beneath it, you'll see the result of the command.
For mine, since my account name is Jacob and I saved it to my desktop I got:
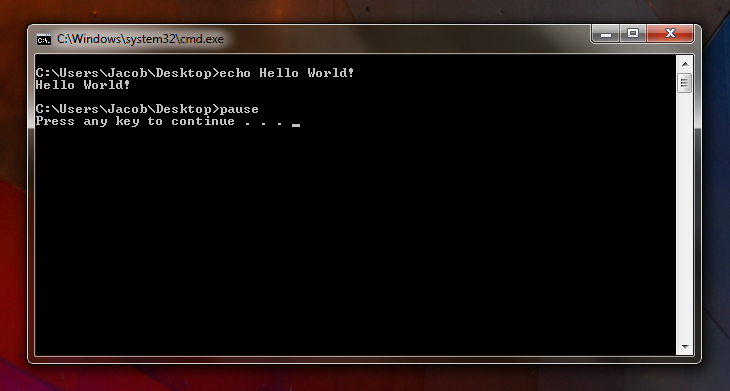
This is actually a good "debugging" tool, we can see where our file is, where the command is, what the command is, and what the result is.
So we can conclude with these results:
If we use "@echo on" we get to see the directory/location of our file and the command.
If we use "@echo off" we simply display the results of our command, we simply see the text we put in.
We use the echo command to echo out text. This prints/writes out a line of text to the screen. We use the pause command to pause the program/application. That way it waits/pauses for user input. In our hello world program, we're simply doing this to make it so the program waits long enough for us to read "Hello World!"
Let's switch @echo on back to @echo off and add in another set of code:
Code:
echo I am testing pause
pause
Lesson 2: Clearing the screen
We do this by using the clear screen command, or rather the cls command.
Let's implement this into our hello world program, alternatively you can create another program.
Let's change our hello world program to have the cls command within:
Code:
@echo off
echo Hello World!
pause
cls
echo I am testing pause
pause
Lesson 3: The REM Command
REM stands for remark. A remark is similar to a comment, if you've ever programmed before. These remarks are not used by the program, they simply help to describe the program to the programmer.
They're very useful.
Let's add in, right beneath our @echo off line, a remark command:
Code:
REM This is a hello world program, where we test cls, pause, and echo commands.
Lesson 4: The start command
Now, first off we're going to do a start command. Create a picture in the same directory folder as your batch file. I'll call mine "example.jpg" but yours could be anything. It could be any type of file, and named anything.
We'll create a new batch file, inside of this blank batch file, add in the following:
Code:
@echo off
echo Hello Friend
pause
echo Let me show you a picture
pause
start example.jpg
pause
Lesson 5: The goto, set, and if commands
These commands really make up the fundamentals of any program.
Now, let's create a new batch file just for this.
Insert the following code:
Code:
@echo off
echo If you would like to see math, type 1 and then press enter
echo If you would like to see a picture, type 2 and then press enter
echo If you would simply like to continue with the program, type 3 and then press enter
set /p option=
if '%option%'=='1' goto :addition
if '%option%'=='2' start example.jpg
if '%option%'=='3' goto :continue

:addition
echo 1 + 1 = 2
pause

:continue
echo I see you chose to continue.
pause
echo Well, I guess I should say good bye, go ahead and press any key.
pause
We then use if statements to determine if something is true.
So we start by checking if the user entered 1, if so, we jump to the addition section. If the user entered 2, we use our start command to open up a picture, and if they typed three, we use some text to wrap up the program and then close by going to the continue section.
We define a section that we can go to by using the :name format.
When we say "goto :addition" it jumps to the addition section, which is the area beneath :addition. In there we simply echo out 1 + 1 = 2 and then pause.
In the :continue section we display some text and pause.
Wait a moment! Did you run it yet? If you jump to the addition section we actually run into the continue section. This is because the program is executed sequentially. We go right from the math section into the continue section. That is a very important concept with batch files.
You don't truly call methods, like you might in object oriented programming. The goto command simply jumps to that line of code, then runs down from there.
Lesson 6: Using other batch files
Create two new batch files. For example purposes, I'll call mine "call.bat" and "open.bat". You'll understand why I chose those names in a moment.
Save these two batch files in the same directory/folder. In the first batch file, the one I called "call.bat" type in:
Code:
@echo off
echo I am going to call another batch file's code when you press enter
pause
call.bat
pause
exit
Code:
@echo off
echo This is from the other batch file
pause
We also use the exit command, this is the proper way to exit a batch file, rather than just letting the code run out. The exit command simply closes/exits the program.
Lesson 7: "Virus" programs
The reason everyone wants to create batch files: viruses. We can create fake viruses simply using the "echo" command to scare people with some official sounding text, or we could go a bit more advanced.
Let's start by launching notepad using a batch file.
Type in:
Code:
@echo off
echo I am opening notepad minimized
pause
start /MIN notepad
pause
echo I am opening notepad maximized
pause
start /MAX notepad
Now, let's examine implementing colors.
Type in the following:
Code:
@echo off
REM testing colors
color 2
echo Testing
pause
cls
color 41
echo Still Testing
pause
exit
For example, when we say "color 41" we're really saying, "background color is 4 (red) and text is 1 (blue)".
Here are some colors for you:
0=black
1=blue
2=green
3=aqua
4=red
5=purple
6=yellow
7=white
8=gray
9=light blue
a=light green
b=light aqua
c=light red
d=light purple
e=light yellow
f=bright white
Alternatively, you can find these by going into command prompt (cmd) and typing in "color help" without the quotation marks.
Now we'll test out the title, type in, to any of the batch files we've created so far:
Code:
title This is the Title
Another good "virus" thing you can do is shutdown computers.
We can use the following code to restart:
Code:
@echo off
START C:\Windows\RUNDLL.EXE user.exe,exitwindowsexec
exit
Code:
@echo off
Shut down the computer

C:\Windows\RUNDLL32.EXE user,exitwindows
exit
For example, if I created a text file on my desktop called "example.txt" I could delete it using the following code:
Code:
@echo off
del example.txt
exit
So, if we wanted to delete a folder, we'd do this using the format:
Code:
deltree *FOLDER NAME*
We can use the format command to format a whole drive. That means we could delete everything on a drive. For example, if we used the following code:
Code:
format C:
So remember:
del - deletes files
deltree - deletes folders
format - deletes everything
Now, part of the point of a virus isn't just to be destructive and delete stuff, sometimes the most effective virus creates things. Just like how cancer works, by reproducing the cancerous cells again and again, we need our virus to work that way.
We could do this using the copy command. Let's say we want to copy something called "first" to the Windows folder.
Well....
Code:
copy first C:\Windows
Say though, we may want to repeat something, again and again. We do this by using a loop, a loop runs code again and again until a condition is met, and this could be useful in creating a virus.
Take a look at this code:
Code:
@echo off
:Loop
echo "hi"
goto Loop
If we wanted to make it conditional, so it continues executing until a condition is met, we would put the goto command in an if statement.
So how do you put everything we've covered into a virus? Easy, just put pieces you like together.
Maybe you want some text leading up to your virus, maybe you want them colored, maybe you want them to delete or copy. Maybe you only want it to happen if a user enters something specific, or maybe you want it to happen immediately.
Go ahead, create your virus! But remember, use it at your own risk. It could damage your computer. I am not responsible for your actions or actions taken against you. I do not support illegal hacking.
No comments:
Post a Comment